
09 Ultrasonic Sensor with Node MCU and Blynk App |Twitter| |Arduino|
Introduction
We are going to interface Ultrasonic Sensor HC-SR04 with Node MCU and Blynk App, and it will send notification when any object comes close to the Ultrasonic Sensor. And it will create a post on Twitter.
Create Project on Blynk App
first of all open your Blynk app and register with email id and password. Click on create project.

This is Create New Project page. we have to type project name, here project name is distance meter then choose device name like Arduino, ESP8266, NodeMCU etc. Here I am using NodeMCU board so I choose NodeMCU.
Connection Type I am using wifi so We have to select Wi-Fi connection type. you can choose Dark or Light theme what you like.

Now click on create button then Authentication Token Number will be send on your registered email address.


Now take notification widget. It will notify on phone screen.
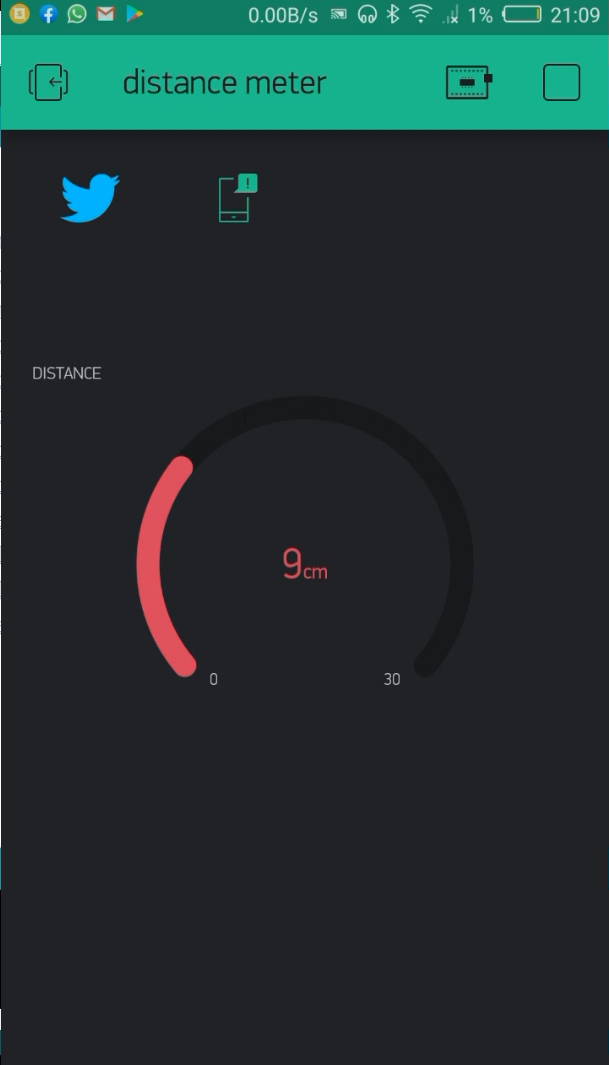
This is final dashboard on phone screen. Twitter, Notification and Gauge are there.

Schematic Diagram
This is schematic diagram. Required components are bellow.
- Node MCU board.
- HC-SR04 (Ultrasonic sensor) .
- Bread board.
- Some male to male jumper wire.


Programming
We will program on Arduino IDE so open Ardunio IDE then include ESP8266WiFi and BlynkSimpleEsp8266 library. define D2 and D1 pin as a trig and echo, and Replace SSID & Password with SSID and Password of your local Wi-Fi network.
 #define BLYNK_PRINT Serial
 #include <ESP8266WiFi.h>
 #include <BlynkSimpleEsp8266.h>
 #define trig D2
 #define echo D1
 long duration;
 int distance;
 // You should get Auth Token in the Blynk App.
 char auth[] = "Auth Token";
 // Your WiFi credentials.
 // Set password to "" for open networks.
 char ssid[] = "SSID";
 char pass[] = "Pass";
 BlynkTimer timer;
trig pin set as output and echo pin set as input. Blynk.begin function stablish connectivity with internet and timer.setInterval function will call every second sendSensor function.
 void setup()
 {
  // Debug console
  pinMode(trig, OUTPUT); // Sets the trigPin as an Output
  pinMode(echo, INPUT);  // Sets the echoPin as an Inpu
  Serial.begin(9600);
  Blynk.begin(auth, ssid, pass);
  // Setup a function to be called every second
  timer.setInterval(1000L, sendSensor);
 }
I have created sendSensor function here pulseIn function return the time between two high pule of echo pin, speed of sound is constant so we can calculate distance by using Time and speed of Sound. distance variable store distance from sensor to object in front of sensor. Serial.print will print distance in cm on Serial monitor. If distance will be less than or equal to 5 cm then Blynk.tweet function will create a post on twitter and Blynk.notify function will send notification on screen that "Post has been twitted". Blynk.virtualWrite function write the value of distance on Gauge widget.
 void sendSensor()
 {
  digitalWrite(trig, LOW);  // Makes trigPin low
  delayMicroseconds(2);    // 2 micro second delay
  digitalWrite(trig, HIGH); // tigPin high
  delayMicroseconds(10);   // trigPin high for 10 micro seconds
  digitalWrite(trig, LOW);  // trigPin low
  duration = pulseIn(echo, HIGH);  //Read echo pin, time in microseconds
  distance = duration * 0.034 / 2;  //Calculating actual/real distance
  Serial.print("Distance = ");    //Output distance on arduino serial monitor
  Serial.println(distance);
  if(distance <= 5)
  {
   Blynk.tweet("My Arduino project is tweeting using @blynk_app and it’s awesome!\n #arduino #IoT #blynk");
   Blynk.notify("Post has been twitted");
  }
  Blynk.virtualWrite(V0, distance);
  delay(1000);            //Pause for 3 seconds and start measuring distance again
 }
Code:
Output


Thanks for visiting🙏


No comments: